
Want to give your wooden staircase a concrete look? Check our tips
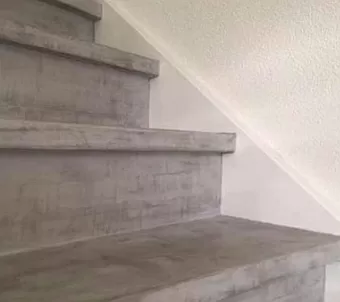
Do you have a wooden staircase at home and you want to give it a concrete look? Making your stairs look like concrete is the trend of the moment and in this blog article I will give you all the good advice to do it yourself!
The grey, somewhat cloudy colors fit very well with a dark industrial interior. Painting the stairs in a concrete paint or applying a concrete mortar is quite a job. You have to sand off all old glue layers, putty the cracks, primer the stairs again and then apply a top layer. This is a job that will keep you busy for a week. If you are a bit handy and patient, you can make the stairs look beautiful again, perfect as a winter or spring job.
If you just want to give the stairs a new paint color read these tips for painting your stairs before you get started, here are useful tips that are worthwhile.
But back to how you can give the stairs a concrete look: to imitate a concrete look on your stairs, there are 3 different ways possible, each with its own level of difficulty:
* Renovating your stairs with transfer steps
* Applying a stucco mortar
* Creating a concrete look in several layers of chalk paint
______________________________
Option 1 Renovate your staircase with a transfer step
Have you ever seen how this is done? The idea is: applying a new transfer stair tread over the existing old damaged stair tread. There are many different brands for sale from very cheap to super expensive, and in many different decors including a concrete look.
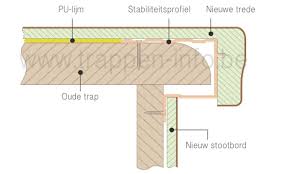
The great thing about this renovation is that it is done quickly, usually within a day your stairs are like new again and the material is also super strong. Don't you want to paint and spend days scraping and sanding your stairs and do you have a budget of about €2,000 for refurbishing your stairs? Then this is a very good choice.
Find out carefully what the qualities are and the guarantees that are given because they differ enormously. If you are a handyman, there are also do-it-yourself packages for sale, you can cover the entire staircase with this material.
What tools do I need for this?
If you want to cover the stairs yourself with stair renovation products, you will need special tools for this.
1) To begin with, a stair spider with which you can measure a deflection of each stair step. You can rotate the rulers to any vanishing point in the stair step.
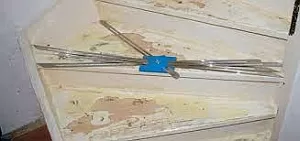
This creates, as it were, a mold of the stair step. You can also make a template using strong tape that you stick to the outside edge of the existing step.
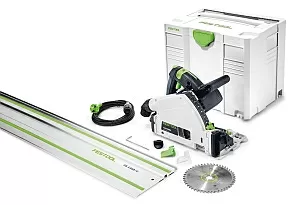
2) You also need a good sawing machine, or even better a ruler saw. With this you have an aluminum guide of approximately 120 cm over which your saw slides, so you move your saw over the material, while with a saw table the material goes over the saw.
It is also very useful if you have a jigsaw, this for the small corners. Some professionals also have a mini belt sander for these corners.
3) If you have an open staircase and you also want to cover the bottom of the stairs, it is useful if you have glue pliers that you can quickly squeeze.
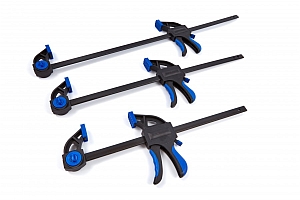
You need at least 8 of these (for 2 steps) This way you can work alternately, because the glue has to dry for an hour. For stair renovation steps, a special pu glue is usually used that expands slightly and can be purchased online.
4) If you also want to cover the sides of the stairs, then plates of 240 cm long and 30 cm wide are also available in the same decors, the thickness is 8 or 11 mm. With this you can cover these flat parts.
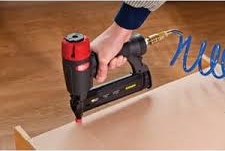
It is very handy if you have a nail tacker with which you can hit small T-pins so that the panels stay in place. There are many frames and corner slats and profiles for sale in the same colors. These are mdf profile frames that are covered with a foil. A nail tacker is also very useful here. With these frames you can finish the edges nicely. If you have these tools, you are already well on your way to a good result.
I want to give you the following tips:
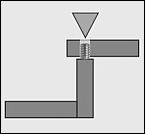
Sometimes, usually with the older stairs, the step is almost flush with the front of the side (stair stringer). This for wood, as the stair maker calls it, is often only half a cm in old stairs.
If you are going to place a transfer step for this, the step will pass the stringer. This is super ugly and not as it should be. The stair renovation specialist then cuts an edge of 1.5 cm from the front of the stair tread with the jigsaw so that the front of the transfer tread falls within the stair side.
This looks exciting to do, but you won't see anything of that later. To keep a good walkable staircase, you should do this on all steps, not just the twisted step, where this usually occurs.
Does your stairs creak a lot? It's a good time to also get this repaired. The creaking noises are usually caused by play between the steps and the nests (milling) or the shrinkage in the risers. The slack is caused by the shrinkage of the wood. There are special creaking screws that can take up this slack. The results of this are very good.
At the top of the old stair step, drill a hole up to the riser. In this hole you screw a screw with a diameter of 14 mm. So you put the step under pressure with the riser, as it were. A screw usually does not work and with this you do not put the step under pressure but under tension. The risers are usually made of fire-retardant chipboard or mdf. Screws do not hold optimally here. My advice is to buy a set of these screws for a few tens.
It is also important that you clean the cracks on the sides well, there is often dirt and perhaps paint residue between them that also cause creaking sounds. So scratch out with a hacksaw and vacuum very well.
_______________________________
Option 2 Finish your stairs in a stucco morta
A concrete look is a complete trend and can now also be applied with a concrete mortar. A big advantage of this is that you don't have to sand the stairs very nicely, but remember, all glue residues must be removed and no loose pieces, remnants of floor covering may remain.
Below is a nice youtube video on how to apply a concrete look mortar.
It is true that you have to be handy and have a bit of plastering experience, the video shows a horizontal plane and then it is not that difficult, but it will be more difficult for the standing sides such as the riser and the sides of the stairs are, however, the result is that it looks very real like a concrete.
The concrete mortar is mixed with a hardener and possibly a pigment to influence the color (there are many different colors for sale) with a spatula the concrete mortar is applied tightly and sanded after drying. When the mortar has completely hardened, the layer can be sanded and possibly provided with a thin layer of wax.
What tools do you need for this:
1) An electric mixer to mix the dye and the concrete mortar very well, this to get a nice even color. Divide the amount into 2 parts.
To get the best result you have to build up the mortar in 2 layers. The thicker you make the mortar, the longer the drying time will be, take this into account. To get a good idea of how it works, it is smart to make a test board first. You can also see the result after the color has dried. Always mix electrically to prevent air bubbles¹ and when mixing do not pour everything into the bucket at once, but small amounts prevent these air bubbles.
2) A good vacuum cleaner is needed to remove all dust properly, also in the corners, if you do not do this, the mortar will loosen over time. Always apply a primer to the wood before applying mortar.
3) A flexible trowel made of aluminium, which gives the mortar that beautiful cloudy concrete effect. When the mortar has almost dried, wet the trowel with water and smooth the surface.
4) Turn sponge and a plant sprayer, with this you finish the top layer nice and tight and do not make the mortar too wet. If you feel with your finger that the mortar is getting too hard, it is time to let it dry.
5) An electric sander to sand the mortar after drying and give it that nice cloudy character. This sanding gives the best result with sandpaper grit 80 to 10.
I want to give you the following tips:
Prepare a bowl of dry mix with the color for if you want to add it later. to repair damage. For protection, apply 2 layers of PU lacquer for easy cleaning and to prevent stains. Don't forget to seal the corners and edges with a flexible color kit.
This prevents water from penetrating into the joints in the corners, causing the mortar to loosen.
__________________________________
Option 3 Finishing in a concrete paint/chalk paint
If you are a real do-it-yourself painter and up for detailed work, you can achieve a very nice result with a chalk paint that also looks very good. How do you handle that? Do you paint your stairs in a concrete look paint? There are several ways to do this.
There are acrylic water-based chalk paints that dry quickly and that you can easily apply and build up in different color layers. The chalk paints have a high lime content, making the paint very matte and therefore easy to sand. You will get the best result if you finish the stairs in 3 layers of chalk. You can then change the color. apply 2 layers of wax or opt for 2 layers with a polyurethane clear coat matt.
Here too, it is the case that you must first thoroughly remove old floor covering glue and loose floor covering residues, so this also applies to doing very good preliminary work and if the stairs have been thoroughly cleaned, provide the stairs with a base layer of primer, if they are properly it is then sanded with grit 120.
Do not try to sand through the paint anymore, the best way to sand is to do this manually with the sandpaper on a sanding block. Then clean it well (vacuum). You can then apply the first layer of lime paint over this.
What tools do I need for this:
For the best result, it is important to properly prepare the surface.
1) A paint blow dryer and sharp paint scraper to melt away the old glue and loose paint. You can also work with a burner, but you need some experience for this because the stairs are usually made of softwood that burns quickly.
2) A good orbital sander with which you can also get into the corners. A staircase has a lot of corners, so a sander that can do its job here is preferred.
3) Electric drill with stir bar. The paint must be stirred well for the best result. Lime paint is a bit thicker than normal, so it is important that you stir well before you start painting. Stirring is best done electrically.
4) Waterproof sandpaper for local sanding of the paint. You must do this dry and do not wet the sandpaper. You can take the sharpness off the sandpaper by rubbing 2 pieces against each other, this makes the sandpaper a bit blunt and you can sand more evenly.
5) It is best to remove sanding dust between layers with a tack cloth. You can buy these at the better hardware stores. Super handy and that way you can be sure that there is no dust left. Vacuuming is possible, but is less suitable because the fabric becomes static due to friction.
I want to give you the following tips:
- Work from dark to light in terms of color structure, this gives the most similar result.
- The layers must also be applied a little thinner. For example, if you apply the last layer and it is thinner, the bottom layer still shines through a bit, which gives depth. So then make the paint a little thinner by adding water.
- If you take an old sock in which you put small sharp pieces of iron, for example screws, nuts and nails, you can make small dents in the wood with this, when sanding the darker color remains visible in the dent, which is a very nice effect gives.
- Make a test board where you test the build-up of the colors here. Remember that the stairs are large so the result will look a bit more intense.
You can see the result in the blog photo below. If you have painted the stairs in a concrete look, it is wise (against wear of the paint) and also much safer (against slipping) to apply an anti-slip tape or strip to the steps.
Below is a nice youtube video on how to apply a concrete look painting technique.
Anti-slip types and uses
If you want to give the stairs sufficient anti-slip, or ensure that the concrete mortar is not damaged, our anti-slip rubber tape can help you with this.
The anti-slip tape is a durable adhesive tape that is easy to apply by anyone and adheres to practically any smooth and hard surface.
If you want to know which colors best suit the concrete look, request a free color card from anti-slip rubber tape.com
Blog Schrijver
Dennis vd Burg


Comments
Login to give reaction Your comment will be posted as soon as it is approved.