

10 Tips for a perfect staircase renovation
If you have just bought a new house, you are of course fanatically working to give the interior that atmosphere that you have in mind.
You have spent months figuring out the dream kitchen and what colors the interior should have. You do see the TV programs from Eigenhuis en Tuin or RTL wonen. Nice programs for good inspiration, because color and style is something very personal and must also match the house.
In addition, living styles change quickly. Read my previous article about the living trends of 2017 in which the colors are also becoming more classic.
All in all, you then face a major challenge. An absolute final item in the interior is the staircase, while you can often make it beautiful again with few resources.
You read a lot about it. Refurbishing your stairs can be done very well these days with the stair renovation systems that are for sale. The principle of this is that you place a new step (transition step) over the existing one and glue it. You have materials in laminate vinyl, laminate HPL and real wood that you can then color and varnish or color and oil.
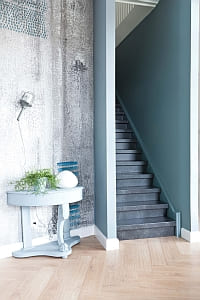
There are incredibly beautiful decors that are indistinguishable from real wood. The trend at the moment is a concrete look.
With this type of stair renovation system you can of course make the stairs look like new again, but there is a cost involved, because a good brand of stair renovation costs about €3,500 for a standard staircase. Usually this budget is no longer available at the end of the renovation. It always comes down to cost. The stairs are usually the closing post.
That is why I will give you 10 tips so that you can make the stairs beautiful and safe without high costs.
TIP 1 Do you have carpet that no longer looks good?
Cleaning is usually not an option. You have to take the carpet off. You can then choose to sand the stairs and make them bare. This does not cost a lot of money a good paint scraper a sander and a lot of patience. If you have the stairs completely clean, you can already give it a thin primer coat of paint, then it is in any case neat and easy to keep clean. If necessary, stick our anti-slip on it if the steps are too slippery.
TIP 2 Are there steps that creak a bit?
If you have cleaned the stairs, check it well for creaking steps, then place one or 2 squat buses on the step. This puts the step under tension again. These stair screws do not work by tightening the stair step, but by pushing out the stair step, filling the space between the stair step.
TIP 3 Are you going to paint the stairs after all, carefully seal the cracks in the stair nests?
Then look very carefully at the cracks in the stair treads, especially where the step is in the sides (string and stair spindle). If there are, scratch them out well with a nail or sharp knife and vacuum out as much of the mess, shavings and dust as possible with the vacuum cleaner. Then close these cracks well with a flexible sealant so that no more mess can get in. Otherwise, when painting your stairs, this mess will become hard and give a creaking sound when you walk on it.
TIP 4 Are you going to provide the stairs with carpeting or sisal products?
A sisal carpet or stair runner is a great alternative, the material is super star, easy to clean and not too expensive to buy. But also check beforehand for cracks and creaking noises and, if necessary, immediately place the cracking bushes in front of the steps before having the floor covering installed and screw the risers securely where necessary at the rear.
TIP 5 Are there no railings on the wall anymore?
Then look for an affordable round banister that has the right curvature. You sometimes see straight railings mounted, but this is not really the case. The banister must follow the shape and curve of the stair string, this is the plank that is attached to the wall and where the steps are fixed. As a result, the distance between the step and the railing is the same everywhere and the railing continues at the same height in the corners, which is nice if you spend a lot of money for a railing. You can go to Stair care or the carpenter's shop, or the local stair maker. They supply handrails that are curved and available in different types of wood and profiles.
TIP 6 Are you going for a staircase renovation?
Then keep an eye on the quality. There are many differences in this, are you handy for less than €1,500,- you have a complete DIY package. If you would rather have it done, take a look at Upstairs or a stair renovation specialist in your area, for example. They come by, measure the sizes and make a non-binding offer. Keep in mind that you will then lose between € 3,500 and € 4,500 in costs, but then you also have something and you will enjoy your stairs for a long time.
TIP 7 If you opt for staircase renovation, buy 1 extra step!
The decors do not always remain in the range for long. If an accident happens and something heavy falls on it, you always have a spare step, which is handy for bathroom and floor tiles.
TIP 8 Have your steps become too slippery due to painting or renovation?
If you have painted or fitted the stairs with a transfer step and you find the steps too slippery? Then there is also the option to apply a super strong adhesive strip, which are available in different colours. You can also opt for stair moons, you know them, they come in many colors and qualities, immerse yourself in this because those super cheap ones won't last long, they quickly become dirty and start to fluff and curl, the better qualities have this much less.
TIP 9 Do you want to paint the stairs but you are not sure which colors?
If you are going to paint the stairs, there are many options in terms of color and combinations of colors. Do you want to give the risers a stainless steel look, for example? You could line them with adhesive plastic that you can buy in many decors. You can also have strips of 8mm mdf sawn at the hardware store and cover them and then stick them in front of the existing riser. Check pinterest for fun ideas and tips. Buy special stair varnish for one last extra layer against wear.
TIP 10 Light up some steps for safety.
Nowadays there are handy strips to illuminate, for example, the first and last step when it is very dark in the hall. You saw this to the right length and glue it. The strip does not need electricity because it is luminescent, say glow in the dark, you see it a lot these days in theaters and on those large ferry boats. The strip recharges during daylight and slowly loses its power at night to recharge later. Really super handy for dark stairwells.
Blog edited by Dennis for antisliprubbertape.com
May 16, 2018 & February 2, 2022


Comments
Login to give reaction Your comment will be posted as soon as it is approved.